
Building Mobile Apps with JavaScript: A Revolution in Android Development
Related posts you may find interesting


Remember when Android development meant mastering Java or Kotlin? Those days are behind us! Today, building an Android app with JavaScript has become not just possible but increasingly popular among developers of all skill levels.
As someone who’s guided countless small businesses through their mobile development journey, I’ve seen how JavaScript has democratized app creation. The programming language that powers the web is now a gateway to the Android ecosystem too.
Here’s a simple breakdown of your JavaScript-to-Android options:
| Approach | Best For | Tools | Difficulty |
|---|---|---|---|
| WebView | Web developers, simple apps | Cordova, PhoneGap | Beginner |
| Hybrid | Cross-platform apps, medium complexity | React Native, Ionic | Intermediate |
| JavaScript + Node.js | Full-stack JS developers | Android JS | Intermediate |
Stack Overflow’s developer surveys consistently rank JavaScript as the world’s most widely used programming language. This widespread adoption means something powerful for business owners: you can leverage existing web development talent to create engaging mobile experiences without starting from scratch.
I love how the creators of Android JS put it: “If you can build a website, you can build an android app.” This isn’t just marketing speak—it’s the reality of today’s development landscape.
What makes JavaScript such a game-changer for Android development? For starters, it allows you to write once and deploy everywhere. The code powering your website can now form the foundation of your mobile presence, saving both time and resources.
Modern JavaScript frameworks give you access to native device features like cameras and push notifications while maintaining performance that rivals traditionally coded apps. For small businesses with limited development budgets, this approach can cut costs dramatically while still delivering professional results.
Building Android apps with JavaScript means you can respond quickly to market changes, test ideas with minimal investment, and maintain a consistent experience across all digital touchpoints.
Want to dive deeper into mobile development options? Check out these helpful resources:
– mobile app development
– making apps for android
– create a phone app
Can You Build Android App with JavaScript?
Yes, you absolutely can! JavaScript has come a long way from its humble beginnings as a browser scripting language. Today, it’s a powerful tool that lets you create fully-functional Android apps that users will love.
JavaScript’s popularity speaks for itself. Stack Overflow’s developer survey consistently shows it topping the charts as the most-used programming language year after year. This widespread adoption has sparked amazing innovations in tools that bridge web and mobile development.
When it comes to building Android apps with JavaScript, three key technologies make it all possible:
First, Android’s WebView components act like mini-browsers inside your app, rendering HTML, CSS, and JavaScript within a native container. Second, JavaScript bridges create communication channels between your JavaScript code and native Android functions. And third, specialized frameworks like React Native, Cordova, and Android JS provide structured environments that make development much smoother.
As one expert developer puts it: “If you want to write apps for Android that use HTML/CSS/JavaScript, you’ll have to at least create a native WebView wrapper. Frameworks such as Appcelerator and PhoneGap do exactly this, except they’ve already written the JavaScript functions for you.”
Let’s see how JavaScript stacks up against traditional Android languages:
| Aspect | JavaScript | Java/Kotlin |
|---|---|---|
| Learning Curve | Gentler for web developers | Steeper for those without OOP experience |
| Performance | Good with modern frameworks | Excellent native performance |
| Code Reuse | Cross-platform (iOS, web, Android) | Android-specific |
| Native API Access | Via bridges and plugins | Direct access |
| Development Speed | Typically faster | More verbose, often slower |
| Community Support | Massive JavaScript ecosystem | Strong Android-specific resources |
Why build android app with javascript in 2024?
The business case for building Android apps with JavaScript in 2024 is stronger than ever.
Cost savings are perhaps the most compelling advantage. By maintaining a single codebase that works across multiple platforms, businesses can cut development costs dramatically. One of our small business clients shared: “We saved thousands of dollars by building our Android app with React Native. What’s more, we were able to launch on iOS just a month later using 90% of the same code.”
Getting to market quickly matters too. JavaScript frameworks come with ready-made components that speed up development. This means you can launch your minimum viable product (MVP) faster and start gathering real user feedback sooner.
Finding talent is also easier. Since JavaScript is the world’s most widely used programming language, the pool of available developers is much larger than for specialized Android developers. This often translates to more reasonable rates and faster hiring.
The JavaScript ecosystem for mobile development keeps getting better too. Take React Native, for example—it has the second-highest number of contributors of any GitHub repository, ensuring it stays current with modern best practices.
build android app with javascript myths debunked
Despite growing popularity, some myths about JavaScript for Android development persist. Let’s set the record straight:
Myth: JavaScript apps always perform poorly compared to native apps.
Reality: Modern JavaScript frameworks like React Native compile to native code, delivering performance that rivals fully native apps in most scenarios. Major players like Facebook, Instagram, and Microsoft rely on React Native for their production apps—a testament to its performance capabilities.
Myth: You can’t access native device features with JavaScript.
Reality: Through various plugins and APIs, JavaScript frameworks can tap into virtually all native device features. Camera? GPS? Accelerometer? Push notifications? All accessible through JavaScript. As one developer told us: “Most functionality is achievable through a WebView and JS bridge, though native performance or advanced hardware access may require additional bridging code.”
Myth: JavaScript apps don’t work offline.
Reality: JavaScript frameworks support robust offline functionality through service workers, local storage, and other caching mechanisms. Many hybrid apps work perfectly well without an internet connection.
Myth: JavaScript apps feel “web-like” rather than native.
Reality: Modern frameworks like React Native use actual native UI components, making apps indistinguishable from those built with Java or Kotlin in terms of look and feel.
The bottom line? Building Android apps with JavaScript is not just possible—it’s a smart, practical approach for many businesses, especially those looking to maximize their development resources while creating high-quality mobile experiences.
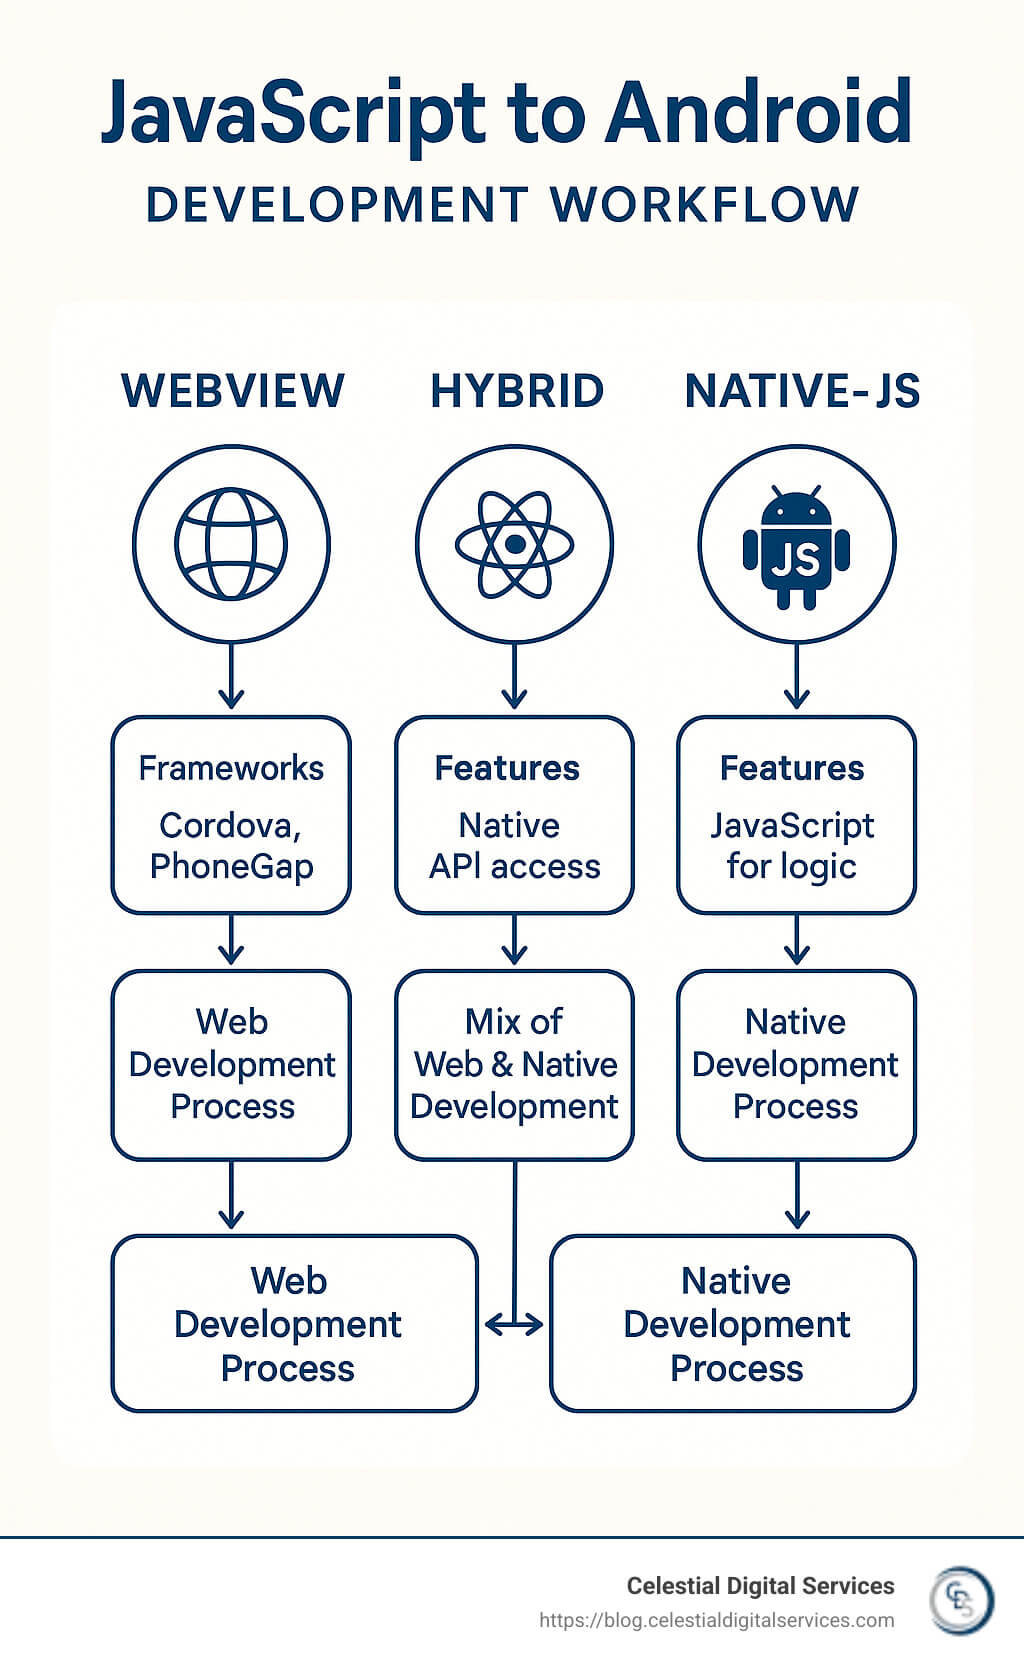
Toolkit Showdown: WebView, Hybrid, Native-JS
When it comes to building Android apps with JavaScript, you’ve got several exciting paths to explore. Think of it like choosing the right vehicle for your journey – each option gets you to your destination, but with different experiences along the way.

WebView wrappers
Remember the first time you realized you could put a website inside an app? That’s essentially what WebView wrappers do – they create a native “frame” around web content. It’s like putting your favorite website in a picture frame that happens to be app-shaped.
The stars of this approach include Apache Cordova/PhoneGap (think of PhoneGap as Cordova’s fancy cousin from Adobe), WebIntoApp for the code-averse among us, and the trusty Android WebView component that makes it all possible.
The beauty of this approach is its simplicity. If you can build a website, you can build an Android app with JavaScript this way. Your existing HTML, CSS, and JavaScript skills transfer directly, and you can often convert web apps into mobile experiences with minimal fuss.
“Using PhoneGap Build is absolutely painless,” shared one developer I spoke with. And they’re right – it’s perfect for content-heavy apps or when you need to mobilize an existing web application quickly.
The trade-off? These apps sometimes feel more like websites in disguise. They might struggle with complex animations, and performance can vary depending on the device’s WebView quality. But for many business needs, especially content-focused applications, this approach hits the sweet spot of speed-to-market and cost-effectiveness.
Hybrid frameworks
Imagine if your JavaScript code could speak fluent “Android” – that’s essentially what hybrid frameworks accomplish. Instead of simply displaying web content, these clever tools use JavaScript to control actual native UI components.
React Native leads the pack here, with impressive industry adoption. Did you know it had the second-highest number of contributors for any repository on GitHub in 2018? That’s no accident – it’s being used by tech giants like Facebook, Microsoft, Discord, and even Tesla.
Other notable players include Ionic (which plays nicely with Angular or React), NativeScript for direct native API access, and the newer Capacitor as a modern bridge between web and native worlds.
The magic of hybrid frameworks is that your apps actually look and feel native because, well, they are using native components! You’ll enjoy near-native performance, the developer-friendly “hot reload” feature (see your changes instantly!), and the ability to share code across platforms.
The learning curve is steeper than WebView approaches, and each framework has its own patterns to master. But the results speak for themselves – apps that users can’t distinguish from traditionally developed native applications.
Native-JS plus Node backend
Here’s where things get really interesting. What if you could take the entire Node.js ecosystem – all those wonderful npm packages – and use them directly in your Android app? That’s exactly what Android JS makes possible.
This approach embeds a full Node.js runtime within your app, using Socket.io IPC to enable communication between the front-end (typically a WebView) and the back-end (Node.js) processes. It’s like having a mini-server running inside your app!
“Android JS framework lets you write android applications using JavaScript, HTML, and CSS or React Native with Node.js support,” as their documentation explains. This is particularly valuable if you’re already comfortable with Node.js development patterns or need specific npm packages in your mobile application.
The approach is newer and less battle-tested than the alternatives, and including a Node.js runtime does increase your app’s size. But for the right project, especially one that would benefit from server-like capabilities on the device, it’s a fascinating option.
Whether you’re looking to quickly convert a website, build a truly native-feeling experience, or harness the power of Node.js in a mobile context, JavaScript offers a pathway to Android development that aligns with your goals and expertise. The JavaScript revolution in mobile development is real, and it’s making app creation more accessible than ever.
Step-by-Step Tutorial: build android app with javascript (React Native)
Let’s roll up our sleeves and create something real! I’ll guide you through building an Android app with JavaScript using React Native – currently the most popular approach for JavaScript mobile development.

Environment & CLI setup
First things first – we need to set up our development environment. Don’t worry, I’ll break it down into manageable steps:
Start by installing Node.js and npm from nodejs.org. Grab the LTS version for the most stable experience.
Next, you’ll need the Java Development Kit (JDK) – version 11 or newer works best with React Native. You can download it from Oracle’s website or use OpenJDK if you prefer open source.
Now for the big one – Android Studio. This powerful IDE gives us everything we need to build and test Android apps. During installation, make sure you select the Android SDK, Platform tools, and the Android Virtual Device (AVD) for testing.
Once Android Studio is installed, take a moment to configure your SDK properly. Launch Android Studio, steer to “More Actions” → “SDK Manager” and install the latest Android SDK Platform, Build-Tools, Emulator, and Platform-Tools.
Don’t forget to set up your environment variables – specifically ANDROID_HOME pointing to your Android SDK location. This step trips up many beginners, but it’s essential for your development tools to find the Android SDK.
Finally, install the React Native command-line tools:
bash

npm install -g react-native-cli
If all this setup feels overwhelming (it can be!), consider using Expo instead:
bash

npm install -g expo-cli
Expo provides a much simpler starting point, especially if you’re new to mobile development. At Celestial Digital Services, we often recommend this approach for clients taking their first steps into app development – you can always “eject” to the full React Native setup later when you need more control.
Project scaffold & “Hello World”
With your environment ready, let’s create your first app:
Start by generating a new project. Open your terminal and run:
“`bash
npx react-native init MyFirstApp
Or with Expo
expo init MyFirstApp
“`
Steer into your shiny new project folder:
bash

cd MyFirstApp
Launch the Metro bundler (the JavaScript compiler for React Native):
“`bash
npx react-native start
Or with Expo
expo start
“`
Now, let’s get your app running on an Android emulator or physical device. In a new terminal window:
“`bash
npx react-native run-android
Or with Expo
expo start –android
“`
Take a moment to explore your project structure. The most important files are:
App.js– This is your main application componentindex.js– The entry point that registers your appandroid/– Contains all the native Android codepackage.json– Lists your dependencies and scripts
Let’s personalize our app by creating a simple “Hello World” screen. Open App.js and replace its contents with:
“`javascript
import React from ‘react’;
import { View, Text, StyleSheet } from ‘react-native’;
const App = () => {
return (
);
};
const styles = StyleSheet.create({
container: {
flex: 1,
justifyContent: ‘center’,
alignItems: ‘center’,
backgroundColor: ‘#F5FCFF’,
},
text: {
fontSize: 24,
fontWeight: ‘bold’,
marginBottom: 16,
},
subtext: {
fontSize: 16,
color: ‘#333’,
},
});
export default App;
“`
Save the file and watch the magic happen – your emulator should refresh automatically thanks to React Native’s hot reload feature. Pretty neat, right?
Accessing native device features
The real power of building Android apps with JavaScript comes from accessing native device capabilities. Let’s look at how to implement some common features:
Camera access is a popular requirement for many apps. Start by installing the camera package:
bash

npm install react-native-camera

npx react-native link react-native-camera
Don’t forget to add camera permissions to your Android manifest file (android/app/src/main/AndroidManifest.xml):
xml

<uses-permission android:name="android.permission.CAMERA" />
Now you can create a component that uses the device camera:
“`javascript
import React from ‘react’;
import { View, Button, StyleSheet } from ‘react-native’;
import { RNCamera } from ‘react-native-camera’;
const CameraComponent = () => {
const takePicture = async (camera) => {
if (camera) {
const options = { quality: 0.5, base64: true };
const data = await camera.takePictureAsync(options);
console.log(data.uri);
}
};
return (
{({ camera }) => (
)}
);
};
“`
Location services are another common requirement. Fortunately, React Native includes built-in geolocation support:
“`javascript
import React, { useState, useEffect } from ‘react’;
import { View, Text, StyleSheet } from ‘react-native’;
const LocationComponent = () => {
const [location, setLocation] = useState(null);
const [error, setError] = useState(null);
useEffect(() => {
navigator.geolocation.getCurrentPosition(
position => {
setLocation(position);
},
err => {
setError(err.message);
},
{ enableHighAccuracy: true, timeout: 15000, maximumAge: 10000 }
);
}, []);
return (
{error ? (
) : location ? (
Latitude: {location.coords.latitude}{‘\n’}
Longitude: {location.coords.longitude}
) : (
)}
);
};
“`
Want to add push notifications? That’s easy too with the right package:
bash

npm install react-native-push-notification
Then set it up in your app:
“`javascript
import PushNotification from ‘react-native-push-notification’;
// Configure the notification channel
PushNotification.createChannel(
{
channelId: ‘default-channel-id’,
channelName: ‘Default Channel’,
channelDescription: ‘A default channel for notifications’,
soundName: ‘default’,
importance: 4,
vibrate: true,
},
(created) => console.log(Channel created: ${created})
);
// Function to show a notification
const showNotification = (title, message) => {
PushNotification.localNotification({
channelId: ‘default-channel-id’,
title: title,
message: message,
playSound: true,
soundName: ‘default’,
vibrate: true,
});
};
“`
Debug, build & release APK/AAB
Once your app is working well, it’s time to prepare it for the real world:
Debugging is crucial for polishing your app. React Native offers several options – shake your device (or press Cmd+D/Ctrl+M in the emulator) to open the developer menu. You can use React Native Debugger for advanced needs or Chrome DevTools for JavaScript debugging.
When you’re ready to prepare for release, you’ll need to configure your app’s identity. Edit the android/app/build.gradle file:
gradle

android {

    defaultConfig {

        applicationId "com.yourcompany.yourappname"

        versionCode 1

        versionName "1.0"

    }

}
For security, generate a signing key that will prove you’re the rightful owner of the app:
bash

keytool -genkeypair -v -keystore my-release-key.keystore -alias my-key-alias -keyalg RSA -keysize 2048 -validity 10000
Store your signing information safely in the android/gradle.properties file:
MYAPP_RELEASE_STORE_FILE=my-release-key.keystore

MYAPP_RELEASE_KEY_ALIAS=my-key-alias

MYAPP_RELEASE_STORE_PASSWORD=*****

MYAPP_RELEASE_KEY_PASSWORD=*****
Then configure your app to use these credentials in android/app/build.gradle:
gradle

signingConfigs {

    release {

        storeFile file(MYAPP_RELEASE_STORE_FILE)

        storePassword MYAPP_RELEASE_STORE_PASSWORD

        keyAlias MYAPP_RELEASE_KEY_ALIAS

        keyPassword MYAPP_RELEASE_KEY_PASSWORD

    }

}

buildTypes {

    release {

        signingConfig signingConfigs.release

    }

}
Now you’re ready to build your release version. For a standard APK:
bash

cd android && ./gradlew assembleRelease
Or for an Android App Bundle (the preferred format for the Play Store):
bash

cd android && ./gradlew bundleRelease
Always test your release build before uploading:
bash

npx react-native run-android --variant=release
Finally, upload to Google Play Console – create a developer account, set up your app listing, upload your AAB file, fill in all the store details, and submit for review.
At Celestial Digital Services, we handle this entire process for our clients – from initial setup through testing and submission. We’ve found that navigating the Play Store requirements can be tricky for first-timers, but with a little guidance, building Android apps with JavaScript makes app development accessible to a much wider range of businesses.
For more detailed information about the basics of Android Studio, check out our guide on Android Studio for Android Phone or dive into the React Native official docs.
Optimization, Native API Access & Publishing
Creating a successful Android app with JavaScript is about more than just getting your code to run. You need to fine-tune performance, connect with native functionality, and steer the publishing process. Let’s explore how to take your JavaScript-built Android app to the next level.

Bridging JavaScript to native modules
While JavaScript frameworks give you access to many native features right out of the box, sometimes you’ll need to dig deeper into Android’s capabilities. This is where native modules come in handy.
Creating a native module in React Native starts with writing some Java code. Don’t worry if you’re not a Java expert – the patterns are straightforward once you’ve seen them in action:
“`java
// android/app/src/main/java/com/yourapp/CustomModule.java
package com.yourapp;
import com.facebook.react.bridge.ReactApplicationContext;
import com.facebook.react.bridge.ReactContextBaseJavaModule;
import com.facebook.react.bridge.ReactMethod;
import com.facebook.react.bridge.Promise;
public class CustomModule extends ReactContextBaseJavaModule {
public CustomModule(ReactApplicationContext reactContext) {
super(reactContext);
}
@Override
public String getName() {
    return "CustomModule";
}

@ReactMethod
public void performCustomAction(String input, Promise promise) {
    try {
        // Your custom native code here
        String result = "Processed: " + input;
        promise.resolve(result);
    } catch (Exception e) {
        promise.reject("ERROR", e.getMessage());
    }
}
}
“`
After creating your module, you’ll need to register it so React Native knows it exists:
“`java
// android/app/src/main/java/com/yourapp/CustomPackage.java
package com.yourapp;
import com.facebook.react.ReactPackage;
import com.facebook.react.bridge.NativeModule;
import com.facebook.react.bridge.ReactApplicationContext;
import com.facebook.react.uimanager.ViewManager;
import java.util.ArrayList;
import java.util.Collections;
import java.util.List;
public class CustomPackage implements ReactPackage {
@Override
public List
List
modules.add(new CustomModule(reactContext));
return modules;
}
@Override
public List<ViewManager> createViewManagers(ReactApplicationContext reactContext) {
    return Collections.emptyList();
}
}
“`
Then add your package to the main application file and call it from JavaScript:
“`javascript
import { NativeModules } from ‘react-native’;
const { CustomModule } = NativeModules;
// Use the module
CustomModule.performCustomAction(‘test input’)
.then(result => console.log(result))
.catch(error => console.error(error));
“`
Handling permissions is another crucial aspect of accessing native features. For instance, if your app needs to use the camera, you’ll need to both declare the permission in your manifest file and request it at runtime:
“`javascript
import { request, PERMISSIONS } from ‘react-native-permissions’;
const requestCameraPermission = async () => {
try {
const result = await request(PERMISSIONS.ANDROID.CAMERA);
return result === ‘granted’;
} catch (error) {
console.error(‘Error requesting camera permission:’, error);
return false;
}
};
“`
The beauty of the React Native ecosystem is that you don’t always have to write custom native modules. For many common needs, someone has already created a plugin. Need file system access? There’s react-native-fs for that. Want to implement push notifications? Check out react-native-push-notification. These community-created bridges save you tremendous time and effort.
UX & performance checklist
When you build Android apps with JavaScript, performance optimization becomes particularly important. Your users expect smooth, responsive experiences regardless of how you built the app.
Render performance is critical. React’s rendering process can sometimes create bottlenecks, especially with complex interfaces. Use React.memo() to prevent unnecessary re-renders of functional components, and implement shouldComponentUpdate for class components. When displaying long lists of data, always reach for optimized components like FlatList or SectionList rather than mapping through arrays with basic components.
One client at Celestial Digital Services saw their app’s scrolling performance improve by over 60% just by switching from a mapped array to FlatList and implementing proper item recycling.
Bundle size matters tremendously for initial load times and overall app performance. Large JavaScript bundles take longer to parse and execute, especially on lower-end devices. Tools like react-native-bundle-visualizer can help you identify unexpectedly large dependencies.
Image optimization is often overlooked but can make a huge difference. I’ve seen apps where unoptimized images accounted for over 70% of the total bundle size! Resize images to match their display dimensions, use modern formats like WebP, and consider libraries like react-native-fast-image for better caching.
Navigation smoothness affects how premium your app feels. Pre-load screens when possible, and implement skeleton screens rather than basic loading spinners. Your users will perceive this as faster, even if the actual loading time is the same.
Accessibility isn’t just a nice-to-have—it’s essential for reaching all users. Add proper accessibility labels, ensure good color contrast, support dynamic text sizes, and test with screen readers. Making your app accessible often improves the experience for everyone.
Battery efficiency will make users more likely to keep your app installed. Location services, network requests, and animations can all drain battery if not implemented thoughtfully. Reduce polling frequency for background processes, batch network requests when possible, and use efficient state management practices.
Post-launch maintenance
Launching your app is just the beginning of your journey. The most successful apps continue to evolve based on user feedback and changing requirements.
Analytics and crash reporting give you visibility into how users actually experience your app. Firebase Crashlytics makes implementation straightforward:
“`javascript
import crashlytics from ‘@react-native-firebase/crashlytics’;
// Log user information
crashlytics().setUserId(‘user123’);
// Log a custom error
try {
// Your code
} catch (error) {
crashlytics().recordError(error);
}
“`
Over-the-Air updates are a game-changer for JavaScript-based Android apps. Unlike fully native apps that require App Store approval for every change, services like CodePush let you push JavaScript updates directly to users:
“`javascript
import codePush from ‘react-native-code-push’;
const App = () => {
// Your app component
};
export default codePush({
checkFrequency: codePush.CheckFrequency.ON_APP_START,
})(App);
“`
This capability alone can be worth choosing JavaScript for your Android development. One of our clients was able to fix a critical bug within hours rather than waiting days for Google Play review.
User feedback loops help your app evolve in the right direction. Build in-app feedback mechanisms, monitor app store reviews religiously, and consider implementing A/B testing for new features. The apps that succeed long-term are those that listen to their users and adapt accordingly.
Versioning strategy might seem like a minor detail, but it becomes increasingly important as your app matures. Follow semantic versioning (MAJOR.MINOR.PATCH), maintain a clear changelog for users, and develop policies for supporting older versions as you move forward.
At Celestial Digital Services, we’ve found that the post-launch phase is where many businesses need the most support. The initial excitement of launching an app can quickly give way to the reality of maintaining and improving it. Our team provides ongoing monitoring, regular updates, and optimization based on real-world usage patterns and feedback.
Building an Android app with JavaScript is just the first step in a longer journey. With proper optimization, thoughtful native integration, and consistent maintenance, your JavaScript-built Android app can deliver exceptional experiences that keep users coming back.
Frequently Asked Questions about JavaScript Android Development
Do I need Java or Kotlin at all?
When you build Android apps with JavaScript, one of the most common questions is whether you need to learn Java or Kotlin at all. The good news is that frameworks like React Native and Cordova are specifically designed to let you create full-featured Android apps without writing a single line of Java or Kotlin code.
Think of these frameworks as your translators – you write in JavaScript, and they handle all the communication with the native Android platform behind the scenes. This is particularly helpful if you’re already comfortable with web development and want to leverage those skills.
That said, there are a few situations where having some basic knowledge of Java or Kotlin can come in handy:
If you need to create custom native functionality that isn’t available through existing plugins, you might need to write a small native module. When troubleshooting certain types of crashes that occur at the native level, understanding the Android logs can speed up your debugging process. And for apps that require absolute peak performance in specific areas, knowing how to optimize critical sections in native code can be valuable.
As one developer I spoke with mentioned: “You can use JavaScript instead of Java or Kotlin” for the vast majority of app development needs. At Celestial Digital Services, we handle any necessary native code integration for our clients, allowing them to focus on what they know best while we take care of the technical complexities.
Which apps are best suited for JS frameworks?
Not all apps are created equal when it comes to using JavaScript frameworks. While modern frameworks like React Native have become remarkably capable, certain types of applications are particularly well-suited for JavaScript development.
Content-focused applications shine with JavaScript frameworks – think news readers, information portals, and content delivery apps. The component-based architecture of React Native makes these types of apps straightforward to build and maintain.
E-commerce platforms also work beautifully with JavaScript frameworks. Product listings, shopping carts, and checkout flows can be implemented efficiently, and the ability to share code between your web and mobile storefronts is a huge advantage.
Business applications like CRM tools, dashboards, and productivity apps are excellent candidates as well. These typically involve forms, data visualization, and API interactions – all strengths of JavaScript frameworks.
On the other hand, apps that push the hardware to its limits may require more careful optimization or native code. This includes graphics-intensive games, video editing tools, and augmented reality applications. That’s not to say these can’t be built with JavaScript – they absolutely can – but they might require more platform-specific optimizations.
What’s remarkable is how many major companies rely on JavaScript frameworks for their production apps. Facebook, Instagram, Discord, and even Tesla use React Native, proving these frameworks can scale to millions of users while maintaining performance.
How do I reuse code for iOS & web?
One of the biggest advantages when you build Android apps with JavaScript is the ability to share code across platforms. With the right architecture, you can write once and deploy everywhere – Android, iOS, and web – with minimal platform-specific code.
Creating a shared core library is the foundation of cross-platform development. This library should contain your business logic, API communication, state management, and utilities – essentially everything that doesn’t directly interact with the platform. By keeping this code platform-agnostic, you can use it everywhere without modification.
Platform-neutral state management is crucial for sharing code effectively. Libraries like Redux, MobX, or Zustand work identically across platforms, allowing you to maintain a single source of truth for your application state:
“`javascript
// store.js (shared across Android, iOS and web)
import { createStore } from ‘redux’;
const initialState = { counter: 0 };
function reducer(state = initialState, action) {
switch (action.type) {
case ‘INCREMENT’:
return { …state, counter: state.counter + 1 };
default:
return state;
}
}
export const store = createStore(reducer);
“`
UI components need a different approach. While the logic can be shared, the rendering often needs to be platform-specific. A common pattern is to create platform-specific implementations with a shared interface:
“`javascript
// Button/index.js
import { Platform } from ‘react-native’;
// Automatically import the right version based on platform
export default Platform.select({
web: () => require(‘./Button.web.js’).default,
default: () => require(‘./Button.native.js’).default,
})();
“`
For maximum code sharing between web and mobile, consider using React Native Web. This library allows your React Native components to render on the web, significantly increasing your code reuse potential.
When platform-specific features are unavoidable, use feature detection and conditional rendering rather than platform checks where possible. This makes your code more resilient to platform changes and easier to test.
With a thoughtful architecture, you can achieve 70-90% code sharing between platforms. This dramatically reduces development time, ensures consistency across platforms, and makes maintenance much more manageable – letting you focus on building great features instead of rewriting the same functionality multiple times.
At Celestial Digital Services, we’ve helped numerous small businesses leverage this code-sharing approach to launch on multiple platforms without multiplying their development costs.
Conclusion
Building Android apps with JavaScript has come a long way over the years. What was once considered an experimental approach has blossomed into a mainstream development strategy acceptd by businesses of all sizes. Today’s frameworks and tools make it entirely possible to create beautiful, high-performing Android applications without diving into the complexities of Java or Kotlin.

When I look back at how far JavaScript-based Android development has come, I’m genuinely amazed at the options developers now have at their fingertips. Whether you prefer the simplicity of WebView wrappers like Cordova, the native-like experience of React Native, or the full Node.js capabilities of Android JS, there’s a JavaScript path that aligns perfectly with your project needs.
Remember those early concerns about performance? They’ve largely been addressed by modern frameworks that deliver speed and responsiveness that rivals native development for most applications. Companies like Facebook, Instagram, and Discord have proven that JavaScript-powered apps can handle even the most demanding user experiences.
One of the most beautiful aspects of this approach is how it opens doors to native functionality. Through well-designed plugins and bridges, your JavaScript code can seamlessly access device features like cameras, geolocation services, and push notifications. The days of being limited to basic web-like experiences are long gone.
The cross-platform benefits simply can’t be overstated. When you build Android apps with JavaScript, you’re not just creating one app – you’re laying the groundwork for iOS and web versions too. This code-sharing approach can dramatically cut your development time and costs, sometimes by as much as 50-70%. For small businesses and startups with limited resources, this advantage is absolutely game-changing.
Behind all this technology stands a vibrant, supportive ecosystem. With millions of developers worldwide using JavaScript and thousands actively contributing to frameworks like React Native, you’re joining a community that continually pushes the boundaries of what’s possible.
At Celestial Digital Services, we’ve seen how these technologies have transformed possibilities for our clients. Our team loves guiding businesses through the entire process – from initial concept sketches to successful app store launches and beyond. We understand the nuances of JavaScript-based Android development and how to leverage its strengths while mitigating any limitations.
Perhaps you’ve got an existing web application you’d like to bring to mobile users. Maybe you’re dreaming up a brand-new cross-platform experience. Or perhaps you’re simply curious about what JavaScript can do in the Android space. Whatever your situation, we’re here to help make that journey smoother and more successful.
Mobile users represent a massive opportunity for businesses of all sizes. With the power and flexibility of JavaScript, reaching them has never been more accessible or cost-effective. Ready to bring your Android app idea to life? Contact Celestial Digital Services today to discuss how we can help turn your vision into a download-worthy reality.